
本文将介绍从Habor的源码进行安装部署和从源码打包的方法。由于笔者在近期的项目过程中会需要修改Habor源码,所以必须要从源码开始编译打包并进行安装部署,本文也是记录这个过程中踩过的坑。
环境要求
硬件要求
| 资源 | 容量 | 描述 |
|---|---|---|
| CPU | minimal 2 CPU | 4 CPU is prefered |
| Mem | minimal 4GB | 8GB is prefered |
| Disk | minimal 40GB | 160GB is prefered |
软件要求
| Software | Version | Description |
|---|---|---|
| Python | version 2.7 or higher | Note that you may have to install Python on Linux distributions (Gentoo, Arch) that do not come with a Python interpreter installed by default |
| Docker engine | version 1.10 or higher | For installation instructions, please refer to: https://docs.docker.com/engine/installation/ |
| Docker Compose | version 1.6.0 or higher | For installation instructions, please refer to: https://docs.docker.com/compose/install/ |
| Openssl | latest is prefered | Generate certificate and keys for Harbor |
官方的从源码编译安装的指导文档
Step 1: 为Habor准备编构建环境
Habor是部署为几个docker容器,并且其大部分代码均采用GO语言编写。编译环境需要 Python, Docker, Docker Compose 和 GO语言的开发环境。请安装下面必须预先安装的软件:
| Software | Required Version |
|---|---|
| docker | 1.12.0 + |
| docker-compose | 1.11.0 + |
| python | 2.7 + |
| git | 1.9.1 + |
| make | 3.81 + |
| golang* | 1.7.3 + |
*optional, required only if you use your own Golang environment.
用自己go环境才需要预先安装GO环境
Step 2: 获取源代码
1 | $ git clone https://github.com/vmware/harbor |
也可以到发布页面habor release下载自己需要的版本
Step 3: 构建安装habor
修改配置文件
编辑 make/harbor.cfg ,主要做必要的配置修改,比如 hostname, admin password and mail server等,详细信息可以参考官方的Installation and Configuration Guide 。
1 | $ cd harbor |
编译运行
你可以用下面的三种方法之一来编译habor源码:
I. 用官方的 Golang image来编译构建
从docker hub获取 Golang image:
1
$ docker pull golang:1.9.2
编译构建,安装启动Habor不带Notary:
1
$ make install GOBUILDIMAGE=golang:1.9.2 COMPILETAG=compile_golangimage CLARITYIMAGE=vmware/harbor-clarity-ui-builder:1.3.0
编译构建,安装启动Habor带Notary:
1
$ make install GOBUILDIMAGE=golang:1.9.2 COMPILETAG=compile_golangimage CLARITYIMAGE=vmware/harbor-clarity-ui-builder:1.3.0 NOTARYFLAG=true
编译构建,安装启动Habor带 Clair:
1
$ make install GOBUILDIMAGE=golang:1.9.2 COMPILETAG=compile_golangimage CLARITYIMAGE=vmware/harbor-clarity-ui-builder:1.3.0 CLAIRFLAG=true
II. 用自己的GO开发环境来编译Habor,然后构建 Harbor
把源码放到 $GOPATH
1
2
3$ mkdir $GOPATH/src/github.com/vmware/
$ cd ..
$ mv harbor $GOPATH/src/github.com/vmware/.编译构建,安装启动Habor不带Notary Notary 和 Clair:
1
2$ cd $GOPATH/src/github.com/vmware/harbor
$ make install编译构建,安装启动Habor带 Notary 和 Clair:
1
2
3
4
5
6
7
8
9
10
11$ cd $GOPATH/src/github.com/vmware/harbor
$ make install -e NOTARYFLAG=true CLAIRFLAG=true
```
### 验证你的安装
If everything worked properly, you can get the below message:
```sh
...
Start complete. You can visit harbor now.
Refer to Installation and Configuration Guide for more information about managing your Harbor instance.
补充
- 使用 Makefile
The Makefile contains these configurable parameters:
| Variable | Description |
|---|---|
| BASEIMAGE | Container base image, default: photon |
| CLARITYIMAGE | Clarity UI builder image, default: harbor-clarity-ui-builder |
| DEVFLAG | Build model flag, default: dev |
| COMPILETAG | Compile model flag, default: compile_normal (local golang build) |
| NOTARYFLAG | Notary mode flag, default: false |
| CLAIRFLAG | Clair mode flag, default: false |
| HTTPPROXY | NPM http proxy for Clarity UI builder |
| REGISTRYSERVER | Remote registry server IP address |
| REGISTRYUSER | Remote registry server user name |
| REGISTRYPASSWORD | Remote registry server user password |
| REGISTRYPROJECTNAME | Project name on remote registry server |
| VERSIONTAG | Harbor images tag, default: dev |
| PKGVERSIONTAG | Harbor online and offline version tag, default:dev |
- Predefined targets:
| Target | Description |
|---|---|
| all | prepare env, compile binaries, build images and install images |
| prepare | prepare env |
| compile | compile ui and jobservice code |
| compile_ui | compile ui binary |
| compile_jobservice | compile jobservice binary |
| compile_clarity | compile Clarity binary |
| build | build Harbor docker images (default: using build_photon) |
| build_photon | build Harbor docker images from Photon OS base image |
| install | compile binaries, build images, prepare specific version of compose file and startup Harbor instance |
| start | startup Harbor instance (set NOTARYFLAG=true when with Notary) |
| down | shutdown Harbor instance (set NOTARYFLAG=true when with Notary) |
| package_online | prepare online install package |
| package_offline | prepare offline install package |
| pushimage | push Harbor images to specific registry server |
| clean all | remove binary, Harbor images, specific version docker-compose file, specific version tag and online/offline install package |
| cleanbinary | remove ui and jobservice binary |
| cleanimage | remove Harbor images |
| cleandockercomposefile | remove specific version docker-compose |
| cleanversiontag | remove specific version tag |
| cleanpackage | remove online/offline install package |
好了,看了官方的指引,感觉还好挺简单的嘛,然后就开始踩坑旅程。
在windows版本下踩过的坑(最终放弃在windows下安装,坑太多了)
python安装(略)
windows下docker安装
到docker官网下载windows版本Install Docker for Windows
Docker发布了Docker for Windows的正式版,于是就可以在Windows下运行Docker容器了。要在Windows下运行Docker,需要满足以下先决条件:
- 64位Windows 10 Pro、Enterprise或者Education版本(Build 10586以上版本,需要安装1511 November更新)
- 在系统中启用Hyper-V。如果没有启用,Docker for Windows在安装过程中会自动启用Hyper-V(这个过程需要重启系统)
由于本人电脑是win10家庭版系统,并没有仔细看说明,安装好Docker for Windows之后运行报错:Docker for Windows requires Windows 10 Pro or Enterprise version 10586, or Windows server 2016 RTM to run
也就是说docker要求win10用户是pro版的,那普通版用户就没法用docker了呢,不过,如果不是使用的Windows 10,也没有关系,可以使用Docker Toolbox作为替代方案。Docker Toolbox on Windows安装步骤参考:
Install Docker Toolbox on Windows
Windows下make安装
先安装MinGW官网下载地址:https://sourceforge.net/projects/mingw/files/latest/download?source=files
环境变量:F:\MINGW\bin
在cmd里面输入命令:mingw-get install gcc g++ mingw32-make
检查环境报错check env failed (CreateProcess give error 193)
安装好需要的软件之后,运行
1
$ make install GOBUILDIMAGE=golang:1.9.2 COMPILETAG=compile_golangimage CLARITYIMAGE=vmware/harbor-clarity-ui-builder:1.3.0
报如下错误: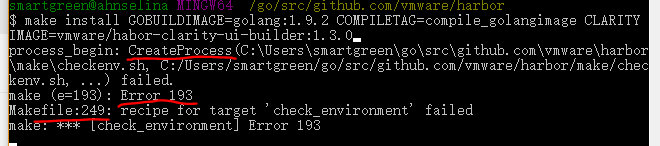
参考 CreateProcess give error 193 :
The file you are attempting to load is not an executable file. CreateProcess requires you to provide an executable file. If you wish to be able to open any file with its associated application then you need ShellExecute rather than CreateProcess

查看源码是在执行checkenv.sh脚本,看该脚本权限,确实没有可执行权限
因此将脚本修改为
“sh: C:\Program: No such file or directory”
改掉这之后,继续又遇到“sh: C:\Program: No such file or directory”错误,查阅资料发现可能是windows里面make版本可能存在bug,遂放弃在windows尝试的念头了。有兴趣的童鞋可以查看:sh: C:\Program: No such file or directory
在Linux下面的安装(CentOS 7)
下面的安装步骤都是针对CentOS 7,其他版本系统请参考各软件官方的安装方法。
安装docker
移除旧的版本:1
2
3
4
5
6
7
8
9
10sudo yum remove docker \
docker-client \
docker-client-latest \
docker-common \
docker-latest \
docker-latest-logrotate \
docker-logrotate \
docker-selinux \
docker-engine-selinux \
docker-engine
安装一些必要的系统工具:1
sudo yum install -y yum-utils device-mapper-persistent-data lvm2
添加软件源信息:1
sudo yum-config-manager --add-repo http://mirrors.aliyun.com/docker-ce/linux/centos/docker-ce.repo
更新 yum 缓存:1
sudo yum makecache fast
安装 Docker-ce:1
sudo yum -y install docker-ce
启动 Docker 后台服务1
sudo systemctl start docker
测试运行 hello-world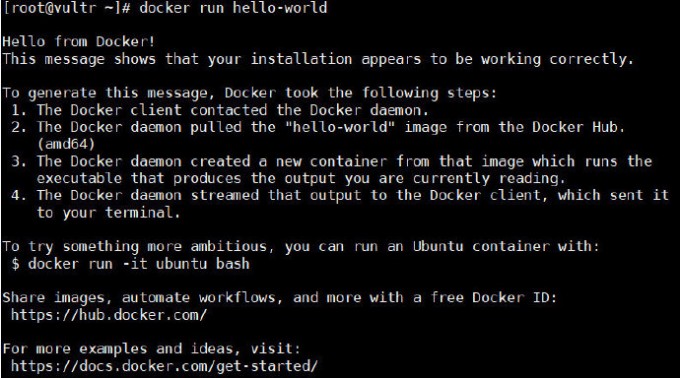
安装docker-compose
步骤1:把下面命令中版本1.23.2换成你需要的版本1
sudo curl -L "https://github.com/docker/compose/releases/download/1.23.2/docker-compose-$(uname -s)-$(uname -m)" -o /usr/local/bin/docker-compose
步骤2:1
sudo chmod +x /usr/local/bin/docker-compose
步骤3:1
sudo ln -s /usr/local/bin/docker-compose /usr/bin/docker-compose
步骤4:验证安装是否成功1
2$ docker-compose --version
docker-compose version 1.23.2, build 1110ad01
安装docker-compose遇到的问题
1 | sudo curl -L "https://github.com/docker/compose/releases/download/1.23.2/docker-compose-$(uname -s)-$(uname -m)" -o /usr/local/bin/docker-compose |
出现curl:(6) Could not resovle host: github.com之类的错误
解决办法:
- Linux在/etc/hosts文件中添加:
1 | 192.30.253.113 github.com |
- Windows:
在路径C:\Windows\System32\drivers\etc
找到host文件,右键-属性-安全-编辑,选中当前电脑登录的用户,给自己最高权限,确认。
然后用记事本打开,将
1 | 192.30.253.113 github.com |
添加到最后即可。
编译打包Habor离线包出现”invalid reference format”错误
错误如图
解决办法:
https://github.com/goharbor/harbor/issues/5316
使用正确的编译打包命令,如下的命令打包不包括NOTARY,CLAIR,MIGRATOR,CHART等:1
make package_offline GOBUILDIMAGE=golang:1.9.2 COMPILETAG=compile_golangimage CLARITYIMAGE=vmware/harbor-clarity-ui-builder:1.3.0
如果需要签名工具和漏洞扫描工具则用如下命令打包:1
make package_offline GOBUILDIMAGE=golang:1.9.2 COMPILETAG=compile_golangimage CLARITYIMAGE=vmware/harbor-clarity-ui-builder:1.3.0 NOTARYFLAG=true CLAIRFLAG=true MIGRATORFLAG=true CHARTFLAG=true HTTPPROXY=
注意:
- vmware/harbor-clarity-ui-builder:后面那个版本号请根据实际填写
- 如未有特别说明,其余步骤按照官方指导操作即可
- 在线安装包直接执行make package_online即可
成功打出了离线安装包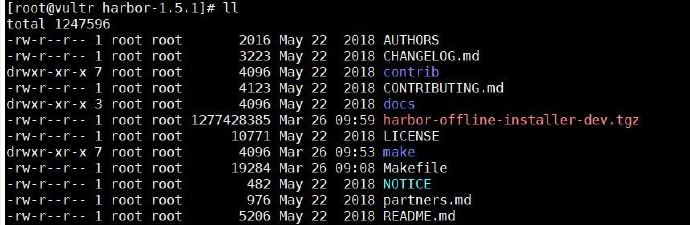
Harbor的启动和停止
Harbor 的日常运维管理是通过docker-compose来完成的,Harbor本身有多个服务进程,都放在docker容器之中运行,我们可以通过docker ps命令查看: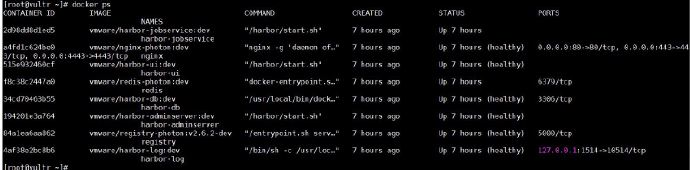
或者docker-compose ps来查看:
注意:使用docker-compose ps来查看habor,路径要正确,否则会报1
2
3
4
5
6ERROR:
Can't find a suitable configuration file in this directory or any
parent. Are you in the right directory?
Supported filenames: docker-compose.yml, docker-compose.yaml
启动Harbor1
# docker-compose start
停止Harbor1
# docker-comose stop
重启Harbor1
# docker-compose restart
访问测试
根据自己的配置情况输入访问的域名;
默认账号密码: admin / Harbor12345 登录后可修改密码
登录成功后如下图:
参考资料:
Habor Installation and Configuration Guide
Is COMPILETAG still in use?
CreateProcess give error 193
sh: C:\Program: No such file or directory
CentOS Docker 安装
搭建Harbor企业级docker仓库